Your project deadlines live in Airtable, but your team checks Google Calendar for meetings. Sales calls get logged in your CRM base, but they don't appear on anyone's schedule until someone manually copies them over. I spent six months manually duplicating event data between these two systems before I realized Make.com could handle the entire sync automatically.
The breaking point came when our content manager missed a client deadline because the due date existed only in our Airtable editorial calendar. She checked Google Calendar that morning, saw nothing urgent, and prioritized other work. That embarrassment cost us a contract renewal.
This tutorial walks through building a bidirectional sync that creates Google Calendar events whenever you add records to Airtable, updates them when fields change, and deletes calendar events when you archive Airtable records. I'm using a content calendar as the example, but this same architecture works for sales pipelines, event planning bases, or any Airtable workflow with date fields.
Prerequisites
Before you start, verify you have:
- A Make.com account (the free tier allows 1,000 operations per month, which is enough for testing)
- Admin access to your Airtable base with API permissions enabled
- A Google Calendar where you have edit permissions (personal or shared calendar works)
- At least one Airtable table with these field types: Single Line Text (for event title), Date (for start time), and optionally Duration or a second Date field for end time
The Airtable API key requirement is critical. If you're on a free Airtable plan, you'll need to generate a personal access token from your account settings. Make.com can't connect to Airtable without this credential, and the error messages won't tell you that's the problem — I wasted two hours troubleshooting connection failures before realizing I hadn't generated the token.
Step-by-Step Guide
Step 1: Set Up Your Airtable Base Structure
Open your Airtable base and make sure you have these fields configured correctly. The field names matter because you'll reference them exactly in Make.com:
- Event Title (Single Line Text) — This becomes the calendar event name
- Start Date (Date field with time enabled) — Must include time, not just the date
- End Date (Date field with time enabled) — Optional if you use a Duration field instead
- Calendar Event ID (Single Line Text) — Leave this empty; Make.com will populate it automatically
The Calendar Event ID field is how we prevent duplicate calendar events. When Make.com creates a Google Calendar event, it returns a unique ID like "abc123xyz". We store that ID back in Airtable so future updates can reference the same event instead of creating duplicates.
Here's a mistake I made initially: I used a Date field without time enabled. Airtable lets you create date-only fields, but Google Calendar requires a specific time. When Make.com tried to sync a record with just "2024-03-15" (no time component), the API returned a 400 error. Enable "Include time" in your Airtable date field settings.
Step 2: Connect Airtable to Make.com
Log into Make.com and click "Create a new scenario." You'll see a blank canvas with a plus icon in the center.
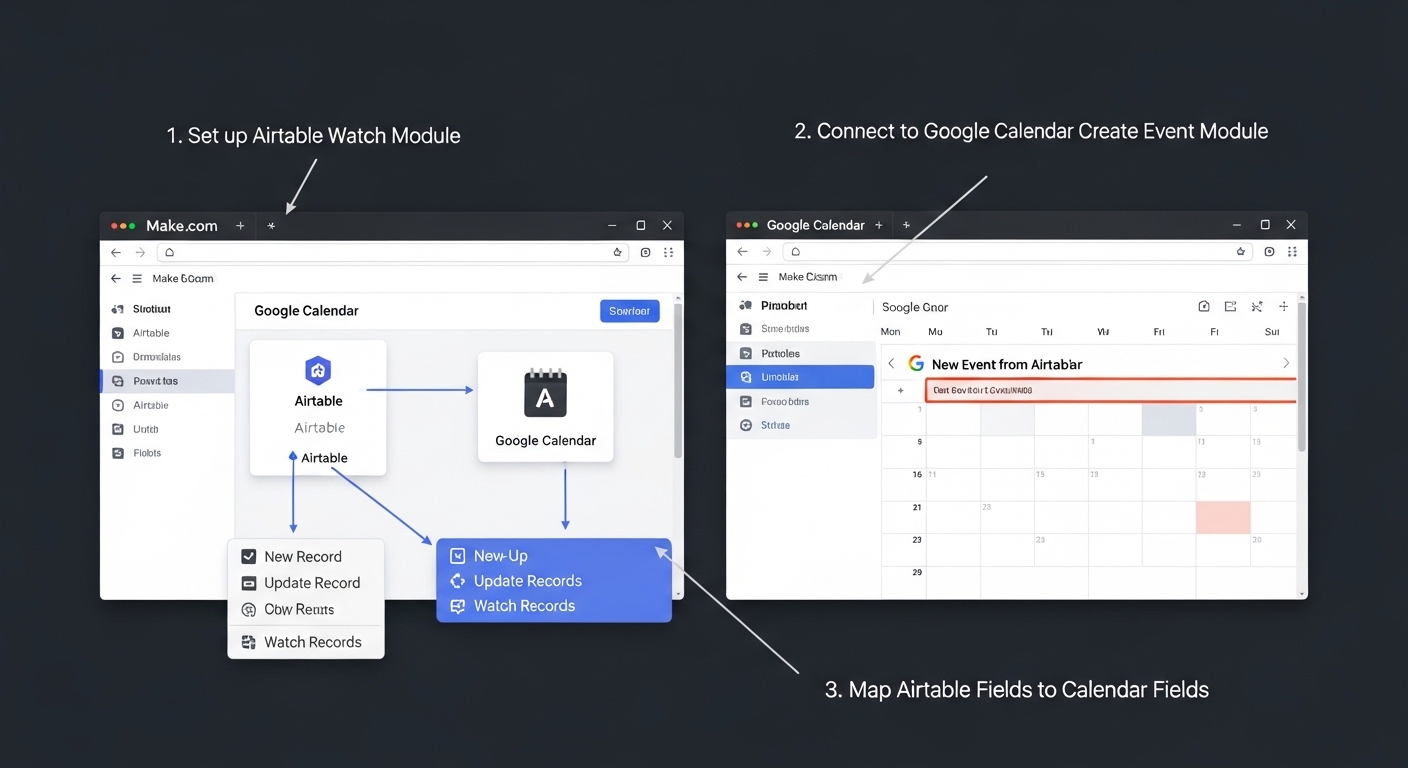
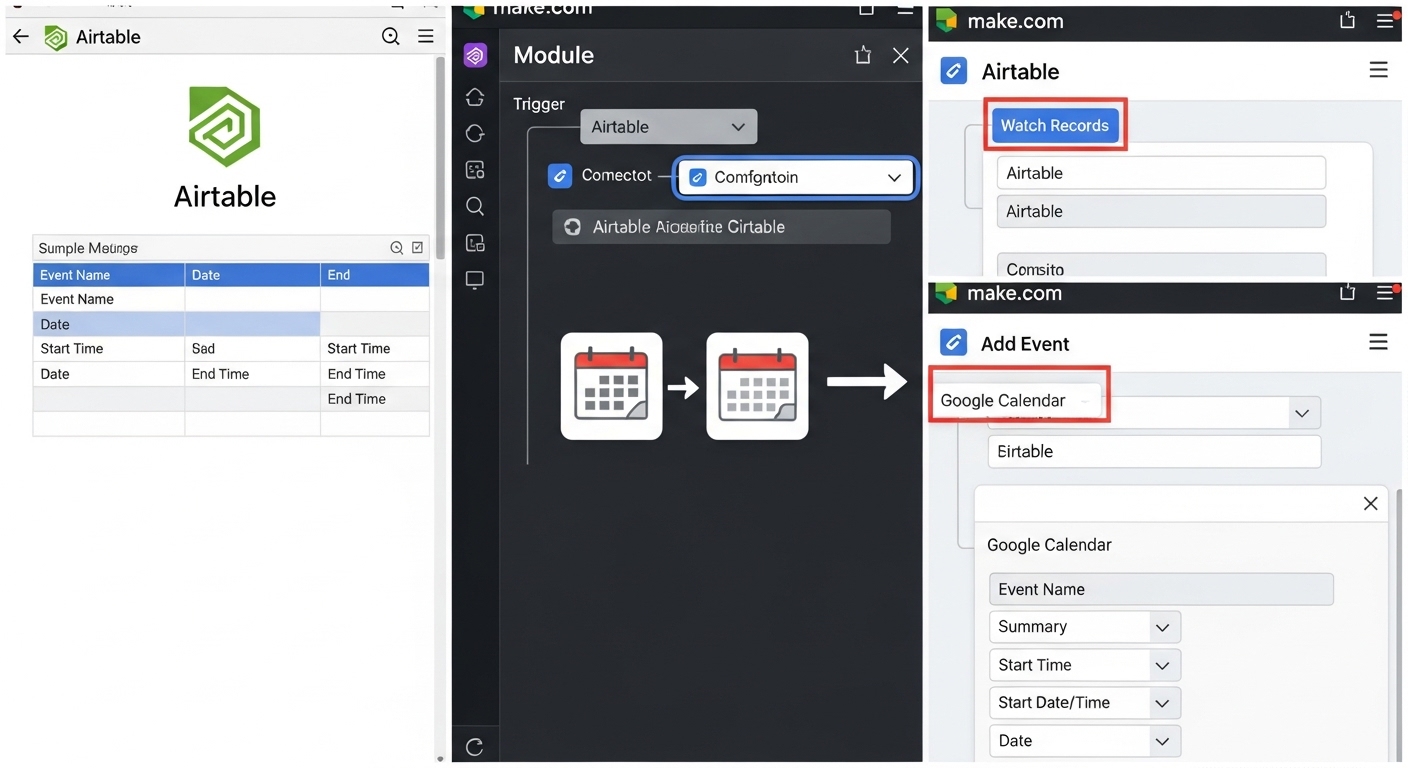
Click the plus icon and search for "Airtable" in the app list. Select "Watch Records" as your trigger module. This module polls your Airtable base every X minutes (you'll set the interval later) and detects new or updated records.
Make.com will prompt you to add a connection. Click "Add" and you'll see two authentication options: OAuth 2.0 or API Key. I recommend OAuth because it's more secure and doesn't require manually copying tokens. Click "Sign in with Airtable" and authorize Make.com to access your workspace.
After connecting, you'll need to configure the Watch Records module:
- Base: Select your Airtable base from the dropdown
- Table: Choose the specific table that contains your event data
- Trigger Field: Pick "Last Modified Time" (you'll need to add this system field to your Airtable table if it's not already there)
- Limit: Set this to 10 for testing; increase to 100 once everything works
The Trigger Field setting determines how Make.com detects changes. If you use "Created Time," it only fires for new records. Using "Last Modified Time" catches both new records and edits to existing ones, which is what we want for bidirectional sync.
Click "OK" and then "Run Once" at the bottom of the screen. Make.com will fetch the most recent records from your table. If you see data populate in the module's output, the connection works. If you see an error about "Table not found," double-check that you spelled the table name exactly as it appears in Airtable — it's case-sensitive.
Step 3: Add a Router to Handle Different Scenarios
Click the plus icon after your Airtable module and search for "Router." This tool splits your workflow into multiple paths, each with its own conditions.
Why do we need a router? Because Airtable records can be in three states:
- New record with no Calendar Event ID → Create a new Google Calendar event
- Existing record with a Calendar Event ID → Update the existing calendar event
- Archived or deleted record → Delete the calendar event
Add the Router module. You'll see it creates a branch point with dotted lines extending to the right. We'll configure three separate paths next.
Step 4: Build Path 1 — Create New Calendar Events
Click the plus icon on the first router path. Search for "Google Calendar" and select "Create an Event."
Make.com will ask you to connect your Google account. Click "Add" and sign in. Make sure you authorize access to the specific calendar you want to sync to — if you have multiple calendars (personal, work, shared team calendar), the default might not be the right one.
Configure the Create an Event module by mapping Airtable fields to Google Calendar fields:
- Calendar ID: Select your target calendar from the dropdown
- Event Name: Click in the field and select "Event Title" from the Airtable module output
- Start Date: Map your Airtable "Start Date" field here
- End Date: Map your Airtable "End Date" field
Here's a critical formatting detail: Google Calendar expects dates in ISO 8601 format (2024-03-15T14:30:00-07:00), but Airtable returns dates in a slightly different format depending on your base's timezone settings. Make.com usually handles the conversion automatically, but if you see "Invalid date" errors, you need to add a date formatting step.
To fix date formatting issues, insert a "Set Variable" module before the Google Calendar step. Use the formatDate() function:
formatDate(Airtable_Start_Date; "YYYY-MM-DDTHH:mm:ssZ")
This explicitly converts the Airtable date into the exact format Google expects. Replace "Airtable_Start_Date" with the actual mapped field from your Airtable module.
Now scroll down to the "Advanced settings" section in the Google Calendar module. Enable "Show advanced settings" and look for the "Extended Properties" option. This is where we'll store the Airtable record ID so we can match them later for updates.
In Extended Properties, add a custom field:
- Key: airtable_record_id
- Value: Map the Record ID from your Airtable module (it's usually labeled as "ID" in the dropdown)
This embeds the Airtable record ID into the calendar event's metadata. We'll use this in the update path to find the right event.
Before you save, go back to the Router and click the small wrench icon on this path. Set the filter condition:
- Label: "New Record"
- Condition: Calendar Event ID (from Airtable) → Does not exist
This ensures the "Create Event" path only fires when the Airtable record doesn't already have a Calendar Event ID stored. Without this filter, you'll create duplicate calendar events every time the record updates.
Step 5: Store the Calendar Event ID Back in Airtable
After creating the Google Calendar event, Make.com returns the event's unique ID in the output. We need to write this ID back to Airtable so future updates can reference it.
Add an Airtable "Update a Record" module after the Google Calendar "Create an Event" step:
- Base: Same base as before
- Table: Same table
- Record ID: Map the Record ID from the original Airtable Watch Records module
- Calendar Event ID: Map the "Event ID" output from the Google Calendar Create Event module
This writes the Google Calendar event ID into your Airtable record. Now when you look at your Airtable base, you'll see the Calendar Event ID field populated with values like "abc123xyz456."
One gotcha here: if your Calendar Event ID field in Airtable has field validation enabled (like "must be a URL" or "must match a pattern"), the update will fail. Make sure the field type is plain Single Line Text with no validation rules.
Step 6: Build Path 2 — Update Existing Calendar Events
Go back to the Router module and click the plus icon on the second path. Search for Google Calendar and select "Update an Event."
Configure it similarly to the Create Event step, but with one critical difference — you need to tell Google Calendar which event to update:
- Calendar ID: Same as before
- Event ID: Map the "Calendar Event ID" field from your Airtable record
- Event Name: Map the updated Event Title from Airtable
- Start Date: Map the updated Start Date
- End Date: Map the updated End Date
The Event ID field is what makes this work. Because we stored the Google Calendar event ID in Airtable during Step 5, we can now pass it back to Google Calendar's API to update the correct event.
Set the filter condition on this path:
- Label: "Existing Record"
- Condition: Calendar Event ID (from Airtable) → Exists
This path only fires when the Airtable record already has a Calendar Event ID, meaning an event was previously created.
Step 7: Build Path 3 — Delete Calendar Events for Archived Records
This step is optional but highly recommended. If someone deletes or archives an Airtable record, the corresponding calendar event should also disappear.
The challenge: Airtable's "Watch Records" trigger doesn't detect deletions. It only sees new and updated records. To handle deletions, you need to add a checkbox field in Airtable called "Archived" or "Deleted."
When someone wants to remove an event, they check the "Archived" box instead of deleting the record. Make.com will detect this as an update (because the Last Modified Time changes) and route it through a deletion path.
Add a third path from the Router. Search for Google Calendar and select "Delete an Event."
- Calendar ID: Same as before
- Event ID: Map the Calendar Event ID from Airtable
Set the filter condition:
- Label: "Archived Record"
- Condition 1: Archived (checkbox field from Airtable) → Equal to → true
- Condition 2: Calendar Event ID → Exists (AND condition)
The second condition prevents errors if someone checks "Archived" on a record that never had a calendar event created in the first place.
After the Delete Event module, add one more Airtable "Update a Record" step that clears the Calendar Event ID field (set it to empty/null). This prevents the scenario from trying to delete the same event repeatedly if the record gets modified again later.
Step 8: Set the Scenario Schedule
Click the clock icon at the bottom left of your scenario (next to "Run once"). This is where you configure how often Make.com checks Airtable for changes.
For real-time sync, set it to "Every 1 minute." But here's the catch: the free Make.com plan gives you 1,000 operations per month. If your scenario runs every minute, that's 1,440 runs per day — you'll burn through your quota in less than a day.
I recommend starting with "Every 15 minutes" for testing. This gives you 2,880 runs per month (well within the free limit) and still feels reasonably real-time. If you need faster sync, upgrade to a paid plan or use webhooks (covered in the Pro Tip section).
Click "OK" and then toggle the scenario to "ON" using the switch at the bottom left. Your Airtable-to-Google Calendar sync is now live.
The "Gotcha" — Timezone Mismatches Will Break Your Sync
Three weeks after deploying this, I got a complaint that calendar events were showing up 5 hours early. A team member in New York scheduled a meeting for 2 PM, but it appeared on the shared Google Calendar at 9 AM.
The culprit: timezone handling between Airtable and Google Calendar.
Here's what was happening:
• Airtable stores dates in the base's configured timezone (mine was set to Pacific Time)
• Google Calendar expects dates in ISO 8601 format with explicit timezone offsets
• Make.com was converting the Airtable date to UTC without preserving the original timezone
The fix requires adding a timezone conversion step. Before the Google Calendar modules (both Create and Update), insert a "Set Variable" module with this formula:
formatDate(parseDate(Airtable_Start_Date; "YYYY-MM-DD HH:mm:ss"; "America/Los_Angeles"); "YYYY-MM-DDTHH:mm:ssZ"; "America/Los_Angeles")
Replace "America/Los_Angeles" with your Airtable base's timezone. You can find the full list of timezone identifiers in Make.com's documentation under "Date and Time Functions."
This explicitly tells Make.com: "Parse this date as Pacific Time, then format it in ISO 8601 while preserving the Pacific Time offset." Without this step, Make.com assumes UTC, which causes the time shift.
Test this by creating an Airtable record with a start time of exactly 12:00 PM in your base. Check the resulting Google Calendar event. If it shows 12:00 PM (not 12:00 AM or a different hour), your timezone handling is correct.
Common Errors & How to Fix Them
Error 1: "Module 'Google Calendar' returned error 404: Not Found"
This happens when the Calendar Event ID in your Airtable record doesn't match any existing Google Calendar event. Common causes:
- Someone manually deleted the calendar event but didn't clear the ID in Airtable
- You're syncing to a different calendar than where the event was originally created
- The Calendar Event ID field contains a typo or extra whitespace
Fix: Add error handling to your Update Event path. Click the wrench icon on the Google Calendar Update module and enable "Error Handler." Choose "Ignore" as the action. This tells Make.com to skip records with invalid event IDs instead of stopping the entire scenario.
For a cleaner solution, add an Airtable Update step in the error handler that clears the Calendar Event ID field when a 404 occurs. This way, the record gets treated as new on the next run and creates a fresh calendar event.
Error 2: "Invalid format: Expected ISO 8601 date-time"
Google Calendar is rejecting your date format. This happens when:
- Your Airtable date field doesn't include time (only date)
- The date value is empty or null
- You're mapping a text field instead of a proper date field
Fix: Go to your Airtable base and verify the date field has "Include a time field" enabled. If the field is optional and might be empty, add a filter before the Google Calendar modules:
Condition: Start Date → Exists AND Start Date → Is not empty
This prevents Make.com from trying to create calendar events for records that don't have valid dates yet.
Error 3: "Scenario execution exceeded operation limit"
You've hit Make.com's monthly operation cap. Each module execution counts as one operation. So if your scenario has 5 modules and runs 200 times, that's 1,000 operations.
Fix: Reduce the scenario frequency. Instead of running every 1 minute, switch to every 15 or 30 minutes. Alternatively, add filters earlier in the scenario to skip records that don't need processing. For example:
After the Airtable Watch Records module, add a filter: Last Modified Time → Greater than → 1 hour ago
This prevents the scenario from re-processing the same records on every run, which dramatically reduces operation count.
Error 4: "Duplicate events keep appearing in Google Calendar"
You're seeing multiple calendar events for the same Airtable record. This means the Create Event path is firing when it shouldn't.
Fix: Check your Router filters. The "New Record" path should ONLY fire when Calendar Event ID does not exist. If the filter is missing or misconfigured, every scenario run will create a new event.
Also verify that the Airtable Update module (Step 5) is actually writing the event ID back. Click on a recent execution in Make.com's history and inspect the output of the Update Record module. If it shows "0 records updated," the field name in your Update module doesn't match the actual field name in Airtable.
Error 5: "Watch Records module returns no data"
The Airtable module runs successfully but doesn't output any records, even though you know there are records in the table.
Causes:
- The "Trigger Field" is set to a field that hasn't changed recently (Make.com only returns records modified since the last run)
- You have a view filter applied in Airtable that's hiding records
- The scenario hasn't run yet, so there's no "last run" timestamp to compare against
Fix: For the first run, Make.com doesn't know what "new" means yet. Manually trigger the scenario by clicking "Run Once" instead of waiting for the schedule. This establishes the baseline. Future runs will catch records modified after this point.
If you're using an Airtable view (like "Active Projects" instead of the full table), make sure the view doesn't filter out records with certain statuses. The Watch Records module only sees records visible in the selected view.
The Watch Records approach polls Airtable every X minutes. If you need instant sync (events appear in Google Calendar within seconds of creating the Airtable record), switch to webhooks.
Here's how it works:
- In Make.com, replace the Airtable Watch Records module with a Webhooks "Custom Webhook" module. Make.com will generate a unique URL like https://hook.us1.make.com/abc123xyz
- In Airtable, install the "Webhook" automation from the Automations marketplace (you need a Pro or Enterprise plan for this)
- Configure the Airtable automation to trigger when a record is created or updated, and send a POST request to your Make.com webhook URL with the record data as JSON
The downside: this requires an Airtable paid plan. If you're on the free tier, stick with the polling method.
Conclusion
This sync eliminated the manual copy-paste workflow that was eating 30 minutes of my team's time every day. More importantly, it removed the risk of missed deadlines because now every Airtable due date automatically appears on everyone's calendar.
Start by syncing one table to one calendar. Get comfortable with the Router logic and error handling. Once that's stable, you can clone the scenario and adapt it for other Airtable bases — I now have three separate syncs running for different departments, all using the same architecture.
If you want to extend this further, check out Niskart's guides on building reverse syncs (Google Calendar → Airtable), handling recurring events, and integrating Slack notifications when calendar conflicts are detected. This tutorial is the foundation for more complex automation chains.
Check also: How to Automate Shopify Invoice Generation with Make.com and Google Drive